1. Содержание экзамена
1. Экзамен проводится с целью проверки у кандидатов в водители навыков управления ТС и определения возможности допуска к экзамену в условиях реального дорожного движения либо в случаях, предусмотренных Правилами, вынесения решения о возможности выдачи водительского удостоверения.
2. Экзамен проводится путем последовательного выполнения испытательных
упражнений. Последовательность выполнения испытательных упражнений,
предусмотренных для ТС соответствующей категории, определяется схемой
организации дорожного движения на автоматизированном автодроме.
2. Организация проведения экзамена
1. Перед началом экзамена в присутствии экзаменатора производится проверка
работоспособности автоматизированной системы автодрома путем включения
соответствующей программы тестирования, а также наличия, исправности и
правильности установки светофорного объекта, дорожных знаков, разметки в
соответствии с экспликацией автодрома.
2. Не допускается проведение экзамена в случаях, если: ТС, используемые для приема экзаменов, не отвечают требованиям Методики; неисправна автоматизированная система автодрома.
3.Перед началом выполнения испытательных упражнений ТС должно быть:
– Установлено в предстартовой зоне
– Двигатель прогрет и выключен
– Стояночный тормоз включен
– Рычаг механической коробки переключения передач в нейтральном положении
4. Контроль выполнения упражнений осуществляется с помощью автоматизированной
системы автодрома.
5. Посадка в ТС кандидата в водители перед началом выполнения испытательных
упражнений и высадка из него после выполнения испытательных упражнений
осуществляется под руководством модератора автоматизированного автодрома.
6. Во время экзамена на территории автоматизированного автодрома не допускается
движение ТС, кроме используемых для приема экзаменов, и пешеходов, кроме лиц,
непосредственно занятых в приеме экзаменов.
3. Порядок проведения экзамена
1. Экзаменатор устанавливает личность кандидата в водители, знакомит кандидата в
водители с порядком проведения экзамена и системой оценки его результатов.
2. По команде экзаменатора кандидат в водители выполняет соответствующий
комплекс испытательных упражнений.
3. В случае выявления в ходе экзамена неисправности автоматизированной системы
автодрома выставленная оценка аннулируется, и экзамен проводится вновь.
4. Система оценки
1. Для каждого испытательного упражнения, а также всего комплекса испытательных
упражнений в целом определен перечень ошибок, за которые кандидату в водители
начисляются штрафные баллы, предусмотренные контрольными таблицами.
2. Оценка «СДАЛ» за экзамен выставляется, если кандидат в водители выполнил в
установленное время все испытательные упражнения, предусмотренные комплексом,
набрав при этом 99 и менее штрафных баллов.
3. Оценка «НЕ СДАЛ» за экзамен выставляется, если кандидат в водители набрал
более 99 штрафных баллов, при этом экзамен прекращается, о чем информируется
кандидат в водители.
5. При проведении экзамена на категории выполняются следующие
испытательные упражнения
 – Порядок и условия выполнения испытательных упражнений первого этапа практического экзамена на категории «A» (г. Алматы)
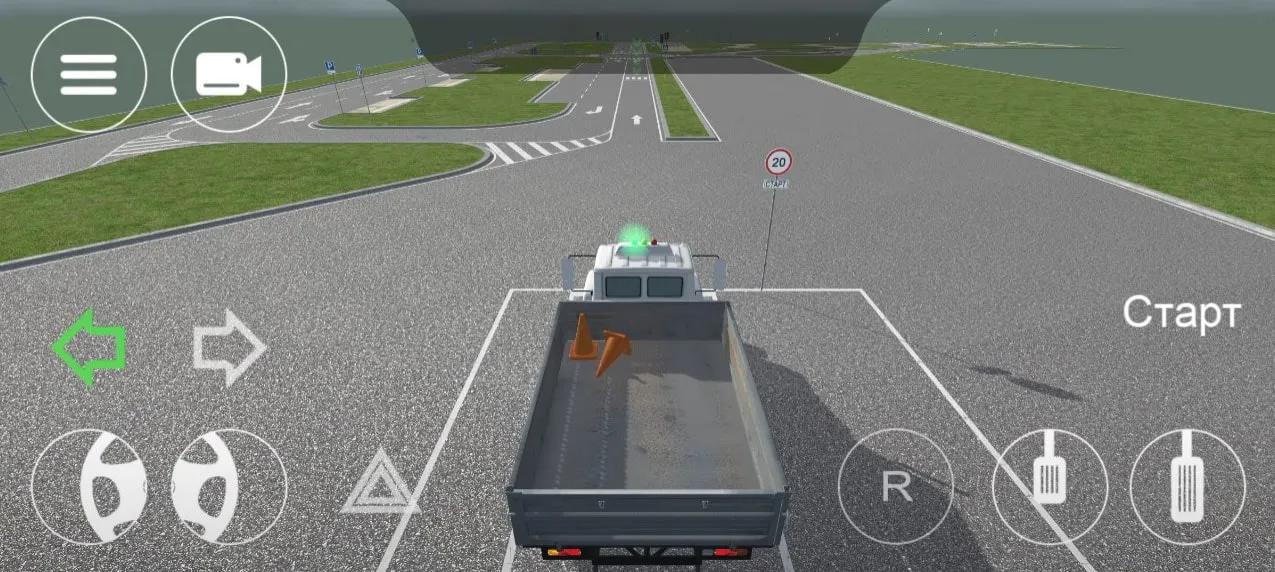
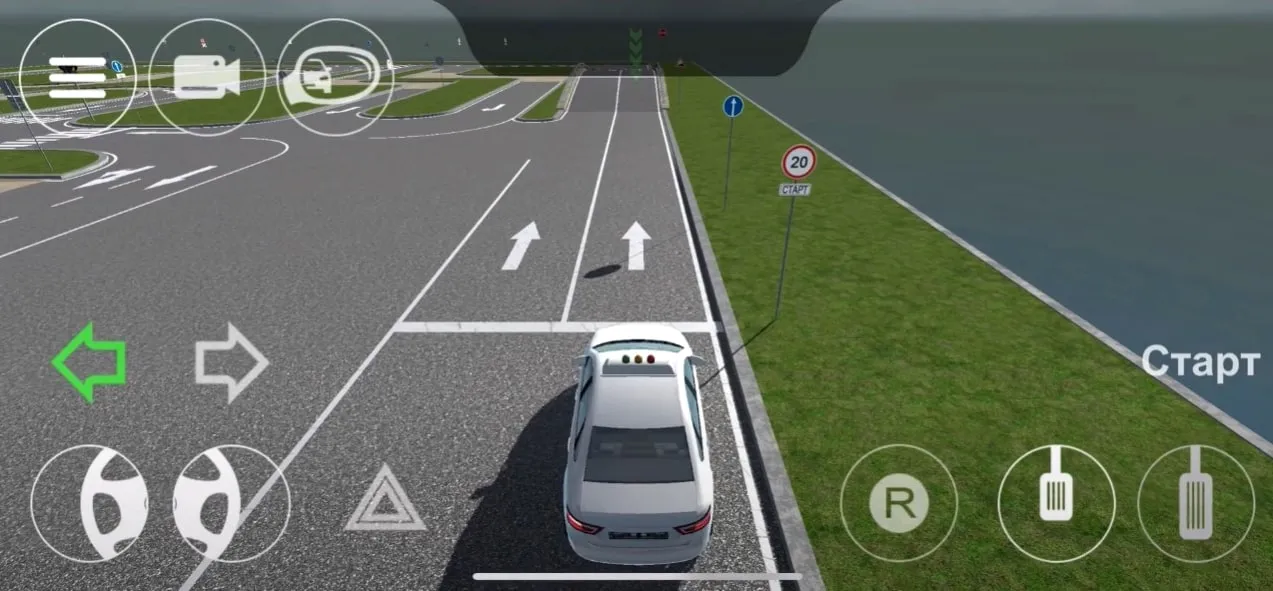
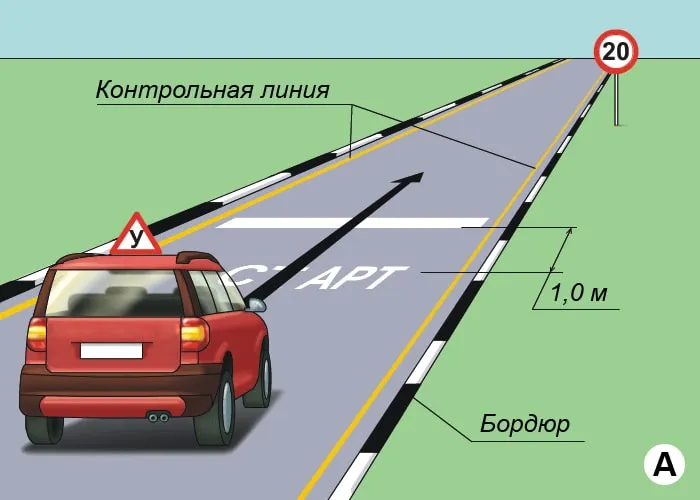
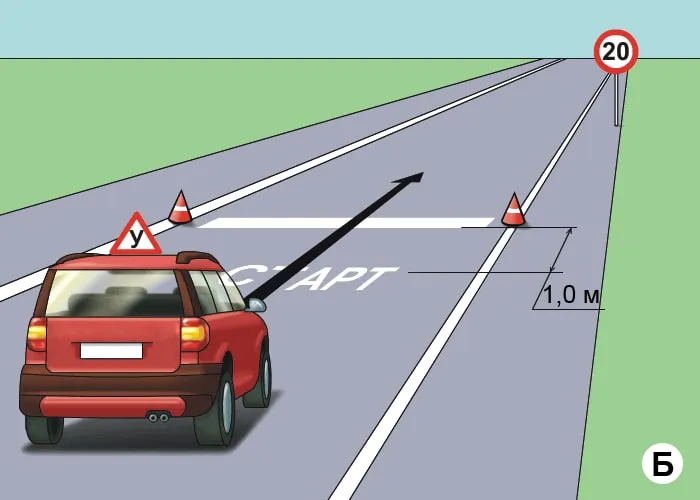
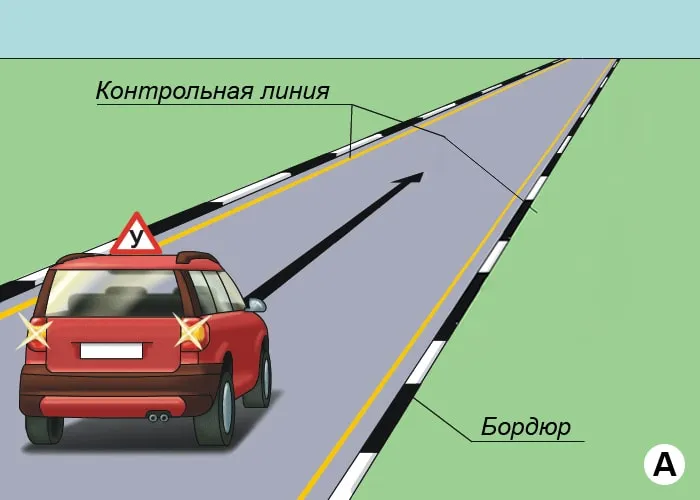
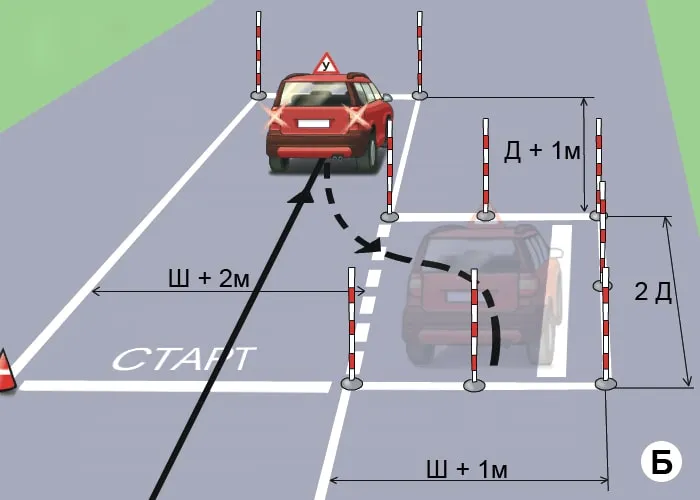
№ 1 «Старт»;
№ 2 «Габаритный коридор»;
№ 3 «Колейная доска»;
№ 4 «Габаритный полукруг»;
№ 5 «Габаритная восьмерка»;
№ 6 «Финиш»;
—————————————————————————————
– Порядок и условия выполнения испытательных упражнений первого этапа практического экзамена на категории «В» (г. Алматы)
№ 1 «Старт»;
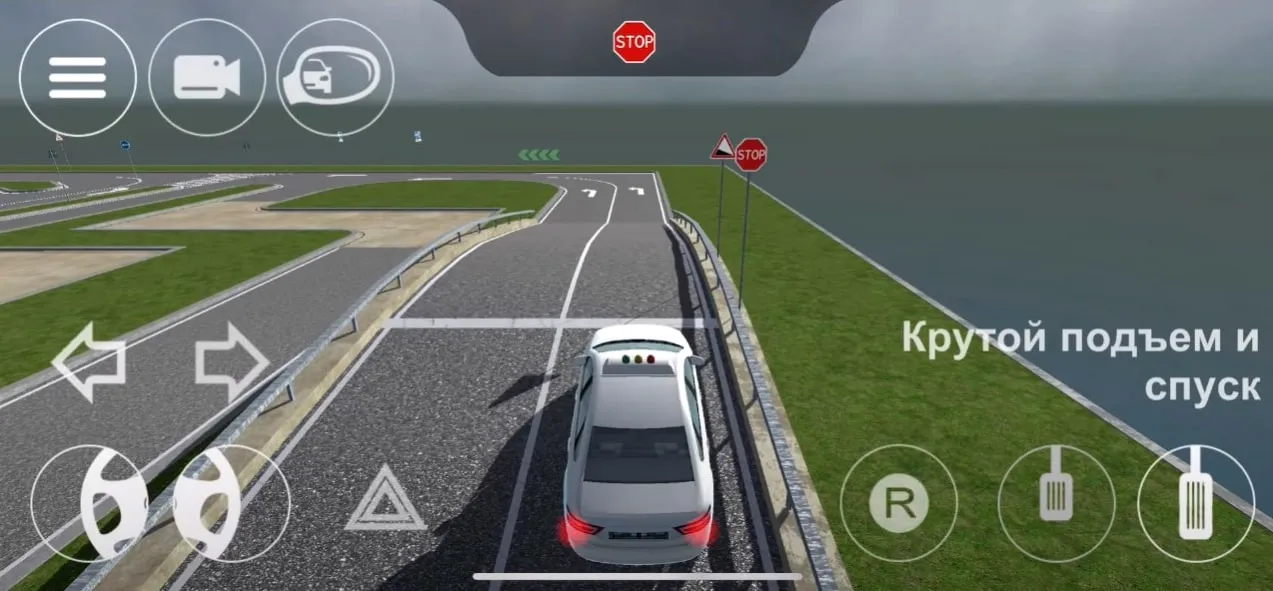
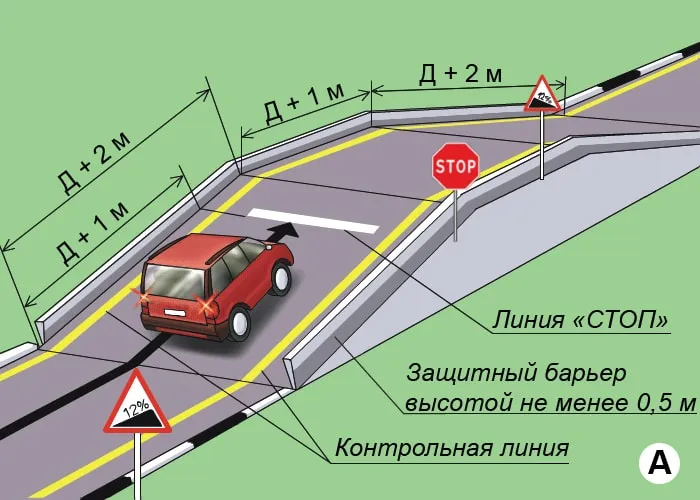
№ 2 «Остановка и начало движения на подъеме»;
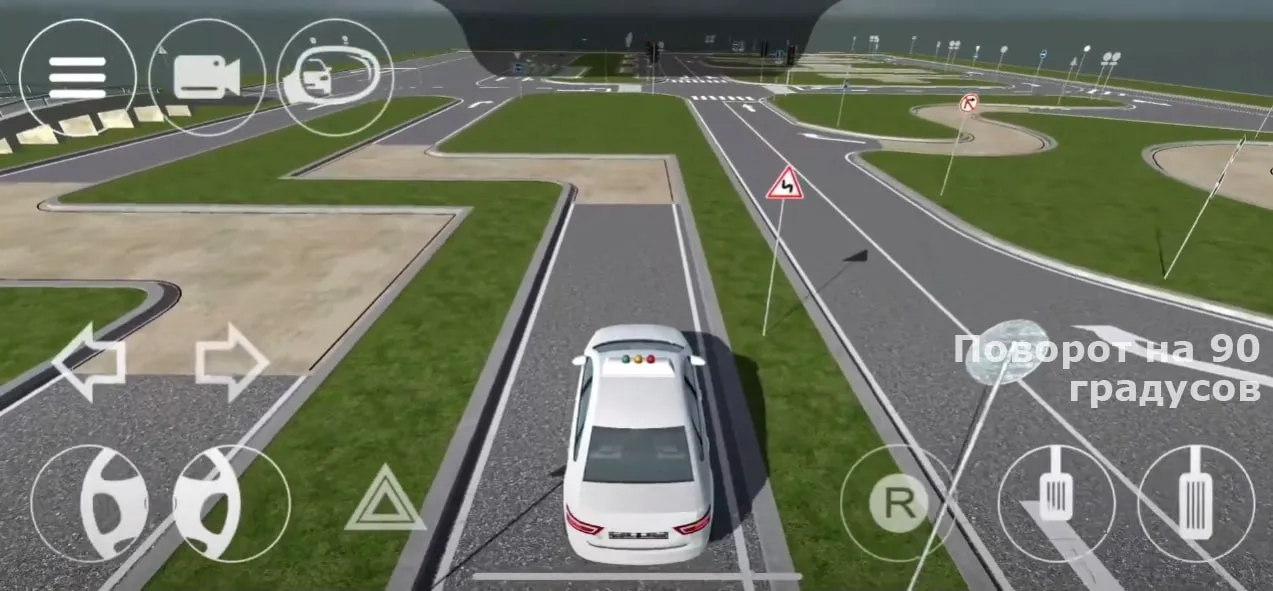
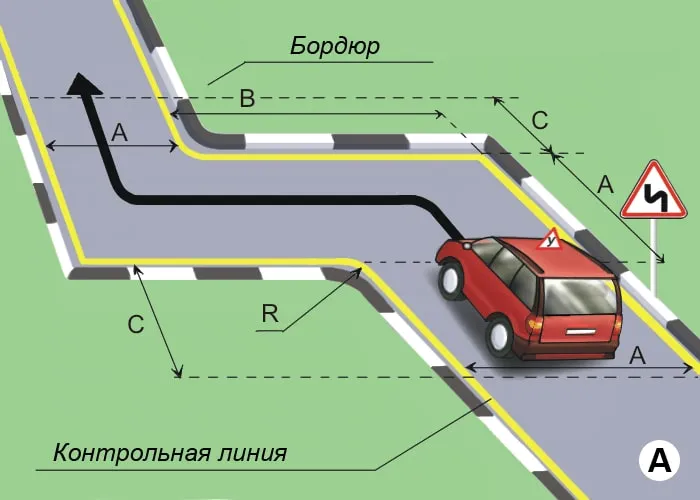
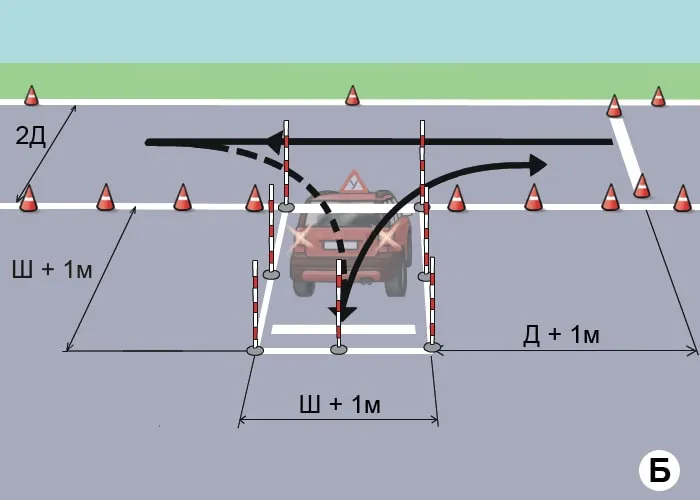
№ 3 «Повороты на 90 градусов»; (убрали)
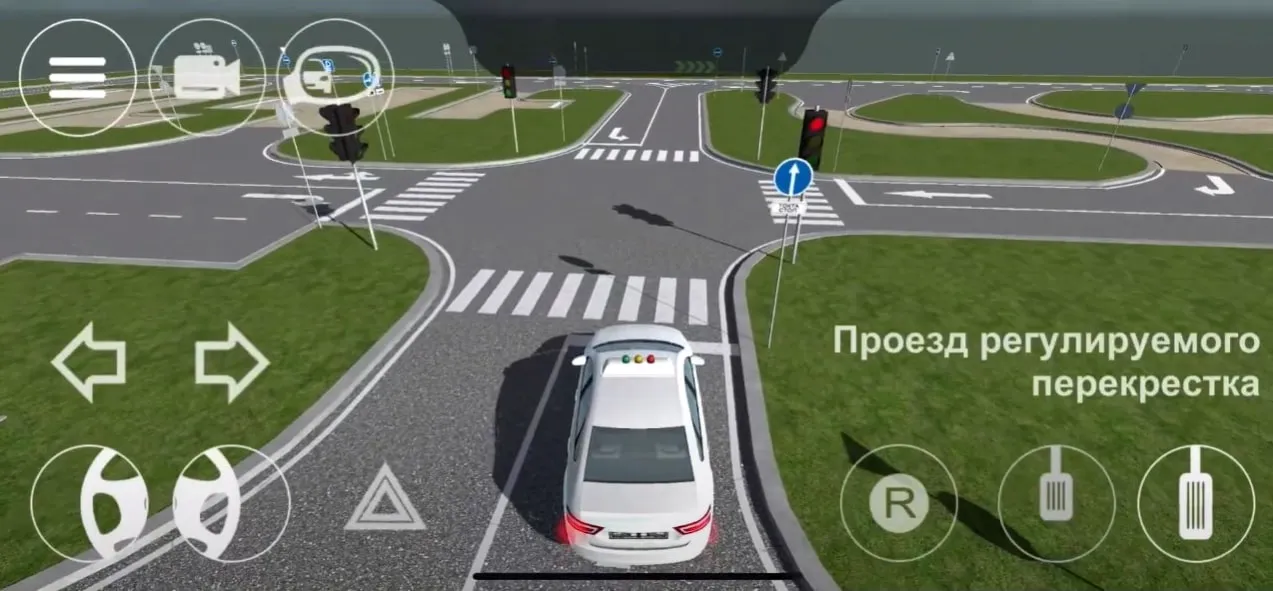
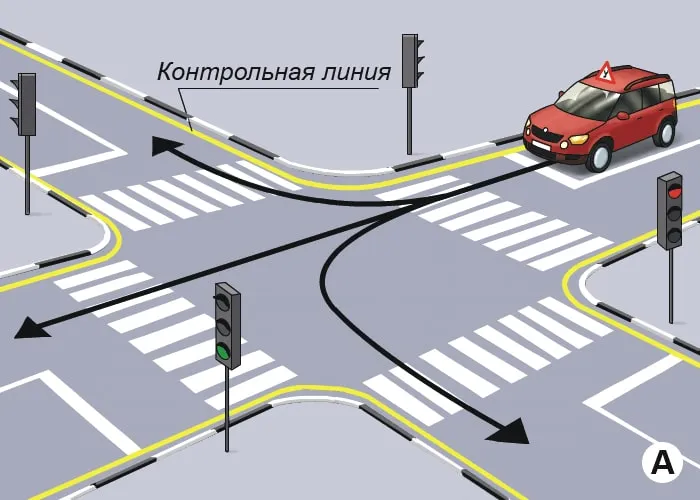
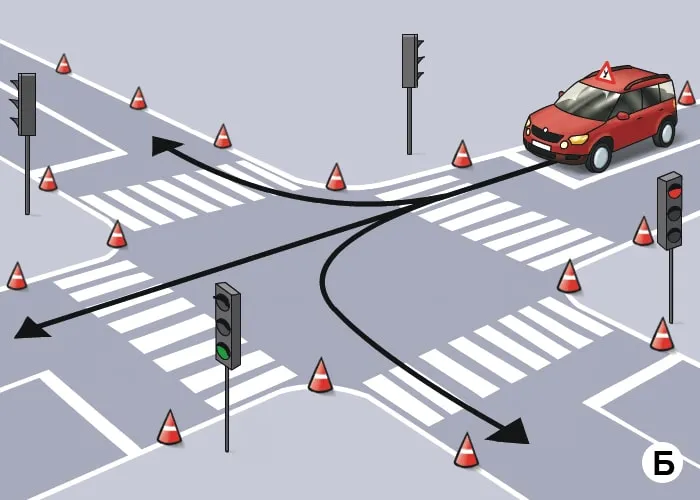
№ 4 «Проезд регулируемого перекрестка»;
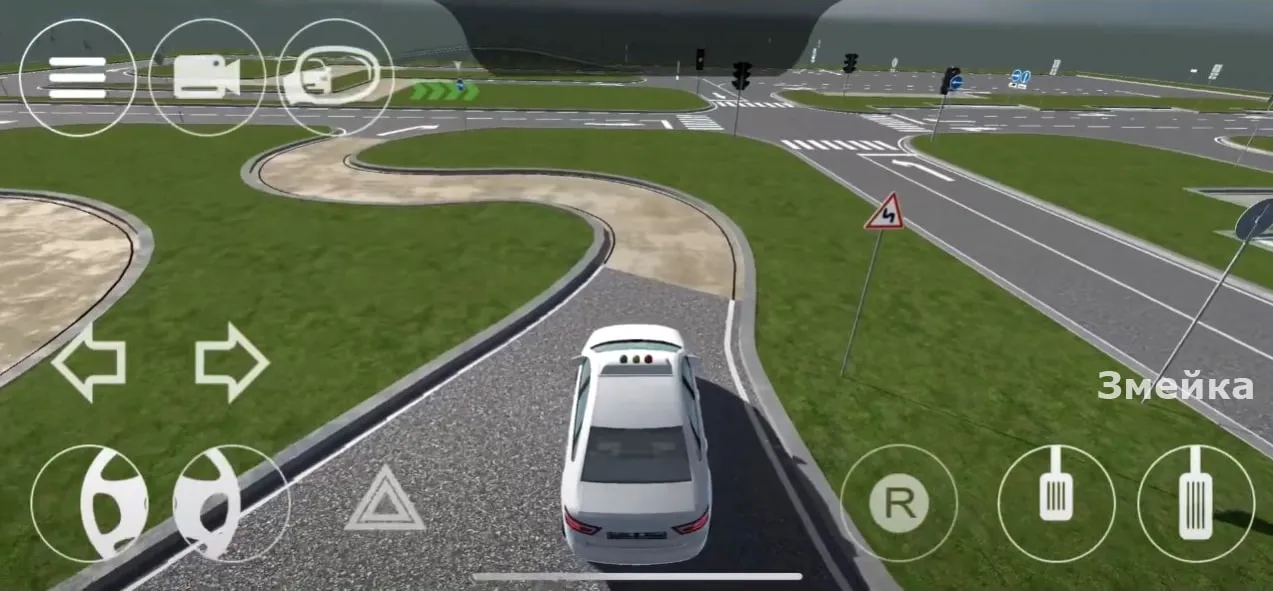
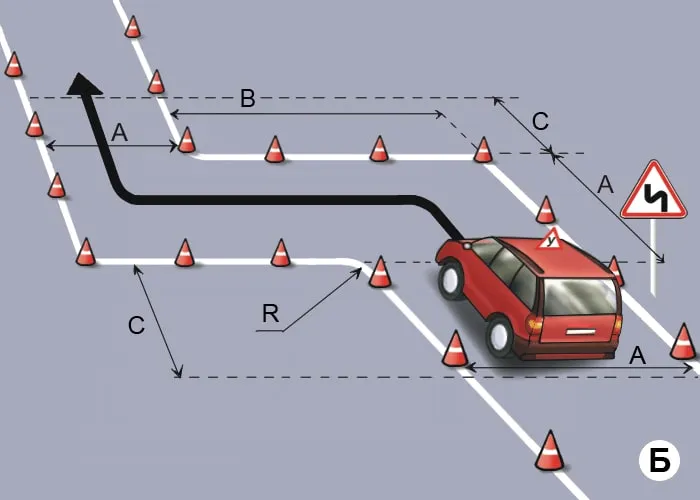
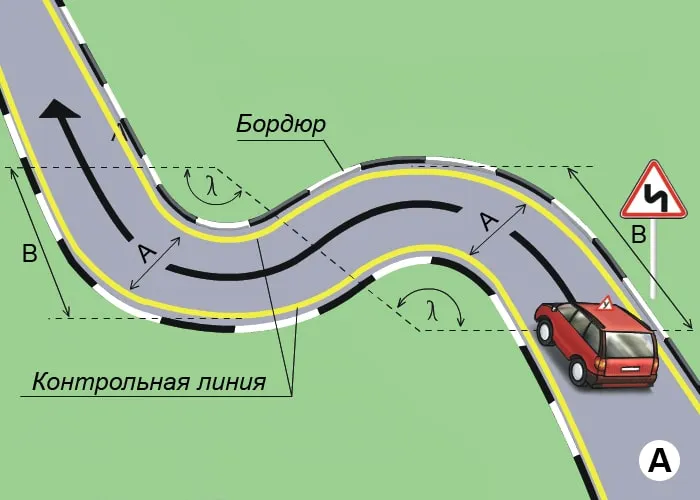
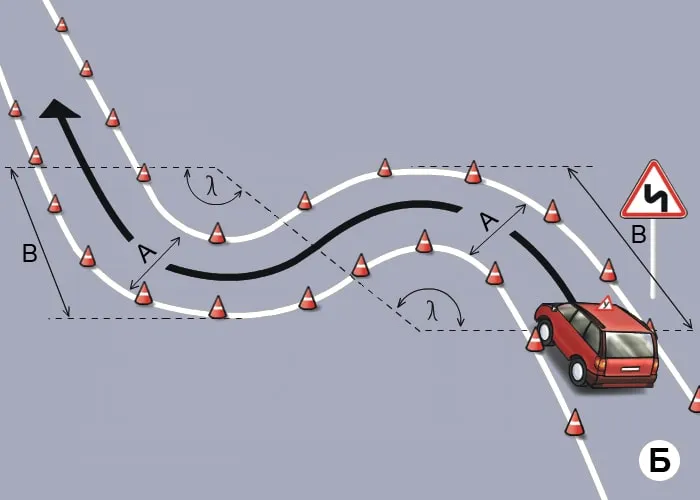
№ 5 «Змейка»; (убрали)
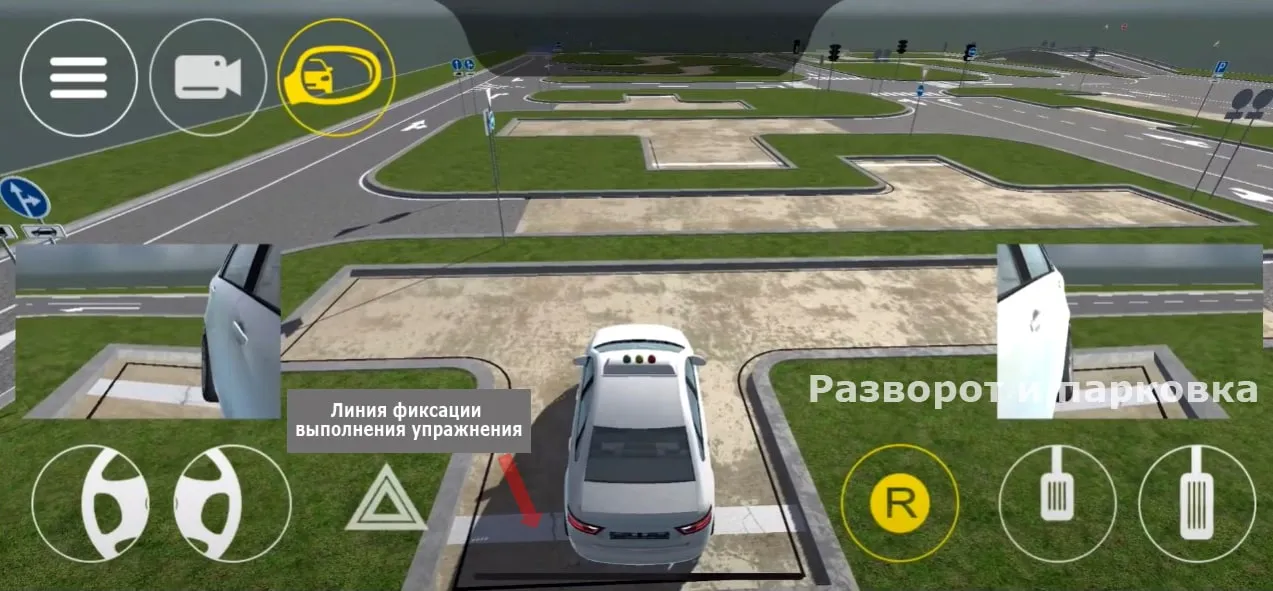
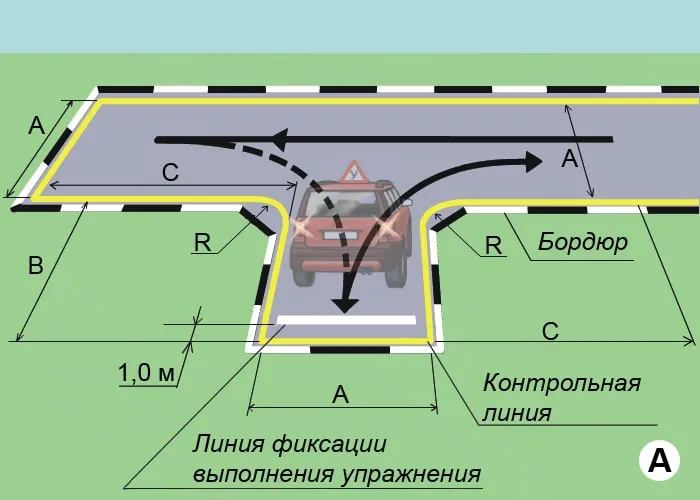
№ 6 «Разворот и парковка»;
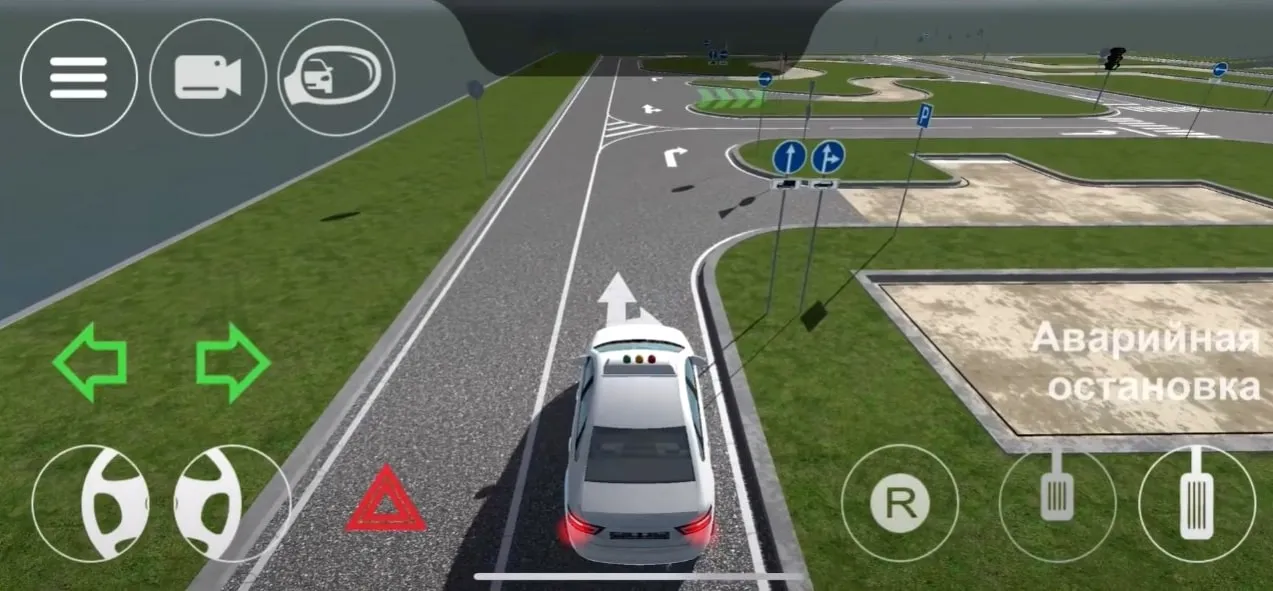
№ 7 «Аварийная остановка»;
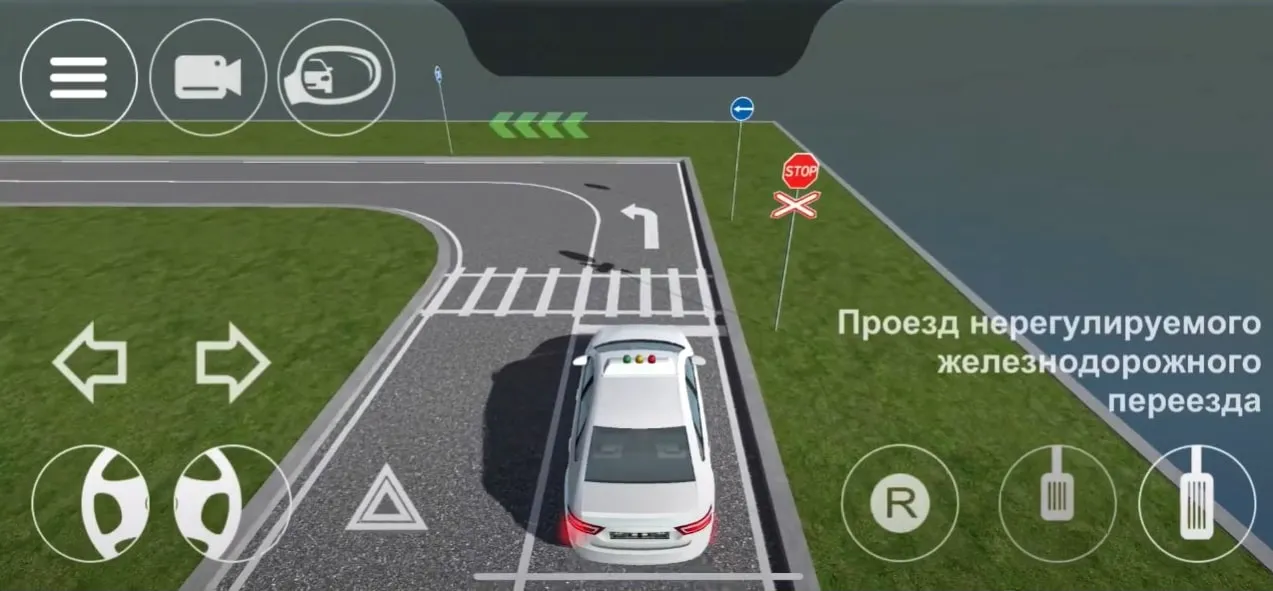
№ 8 «Проезд железнодорожного переезда»;
№ 9 «Полоса разгона»; (убрали)
№ 10 «Параллельная парковка задним ходом»;
№ 11 «Остановка пешеходного перехода при повороте направо»;
№ 12 «Финиш».
—————————————————————————————
– Порядок и условия выполнения испытательных упражнений первого этапа практического экзамена на категории «С» (г. Алматы)
№ 1 «Старт»;
№ 2 «Остановка и начало движения на подъеме»;
№ 3 «Проезд регулируемого перекрестка»;
№ 4 «Проезд железнодорожного переезда»;
№ 5 «Полоса разгона»; (убрали)
№ 6 «Аварийная остановка»;
№ 7 «Повороты на 90 градусов»; (убрали)
№ 8 «Параллельная парковка задним ходом»;
№ 9 «Разворот и парковка»;
№ 10 «Змейка»; (убрали)
№ 11 «Проезд пешеходного перехода при повороте направо»;
№ 12 «Финиш».
6. Например: На категорий “В” выполняются следующие испытательные упражнения
| 1. СТАРТ |
| |
ОПИСАНИЕ
Перед началом выполнения упражнения:
1. Отрегулируйте зеркала заднего вида и сиденье;
2. Пристегнитесь ремнем безопасности;
1. Запустите двигатель:
2. Потвердите готовность к старту, включив сигнал левого поворота;
3. По команде «СТАРТ» в течении 20 секунд начните движение;
4. Пересеките линию «Старт» по проекции габаритов ТС на горизонтальную плоскость с включенным сигналом левого поворота
5. Выключите сигнал левого поворота на участке не более 10 метров после линии «СТАРТ».
ОШИБКИ И ШТРАФНЫЕ БАЛЛЫ
– Не начал движение в течении 30 сек. после сигнала «СТАРТ». 100 ШБ
– Не начал движение в течении 20 сек. после сигнала «СТАРТ». 25 ШБ
– Не пристегнул ремень безопасности. 5 ШБ
– Пересек линию «СТАРТ» по проекции габаритов ТС с выключенным указателем левого поворота. 5 ШБ
– Не выключил указатель левого поворота на участке 10 метров после линии «СТАРТ». 5 ШБ
|
| 2. ОСТАНОВКА И НАЧАЛО ДВИЖЕНИЯ НА ПОДЪЕМЕ |
| |
ОПИСАНИЕ
1. Остановите ТС на участке подъема таким образом, чтобы проекции переднего и заднего габарита ТС на горизонтальную плоскость находились между линией фиксации выполнения упражнения и линией «СТОП»;
2. Зафиксируйте ТС в неподвижном состоянии и не ранее чем через 3 секунды после остановки продолжите движение в прямом направлении, не допуская отката ТС назад.
ОШИБКИ И ШТРАФНЫЕ БАЛЛЫ
– При остановке ТС не пересек линию фиксации выполнения упражнения по проекции заднего габарита ТС или пересек линию «СТОП» по проекции переднего габарита ТС. 25 ШБ
– Начал движение ранее, чем через 3 сек. после остановки. 25 ШБ
– Не начал движение в течении 30 сек. после остановки. 25 ШБ
– Совершил откат ТС на величину более 0,2 метра после остановки или начала движения. 20 ШБ
|
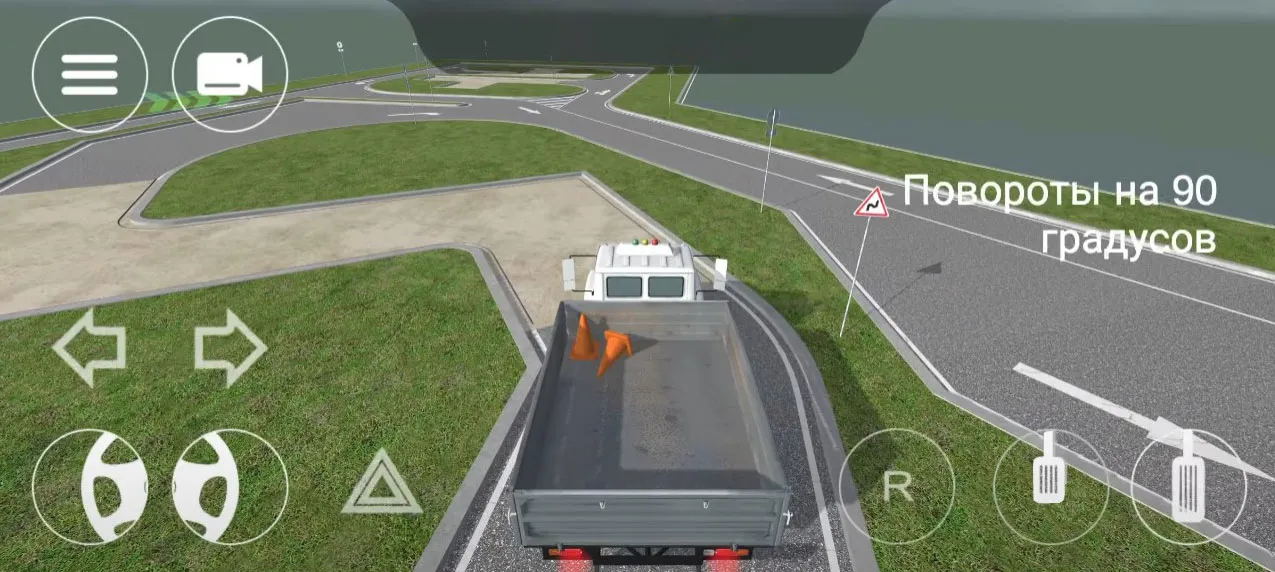
| 3. ПОВОРОТ НА 90 ГРАДУСОВ |
| |
ОПИСАНИЕ
1. Водитель должен не более чем за 2 минуты проехать участок дороги с левым и правым поворотами, не наезжая колесом на контрольной линии.
ОШИБКИ И ШТРАФНЫЕ БАЛЛЫ
– Наехал колесом на контрольную линию. 20 ШБ
– Затратил на выполнение упражнения более 2 минут. 15 ШБ
|
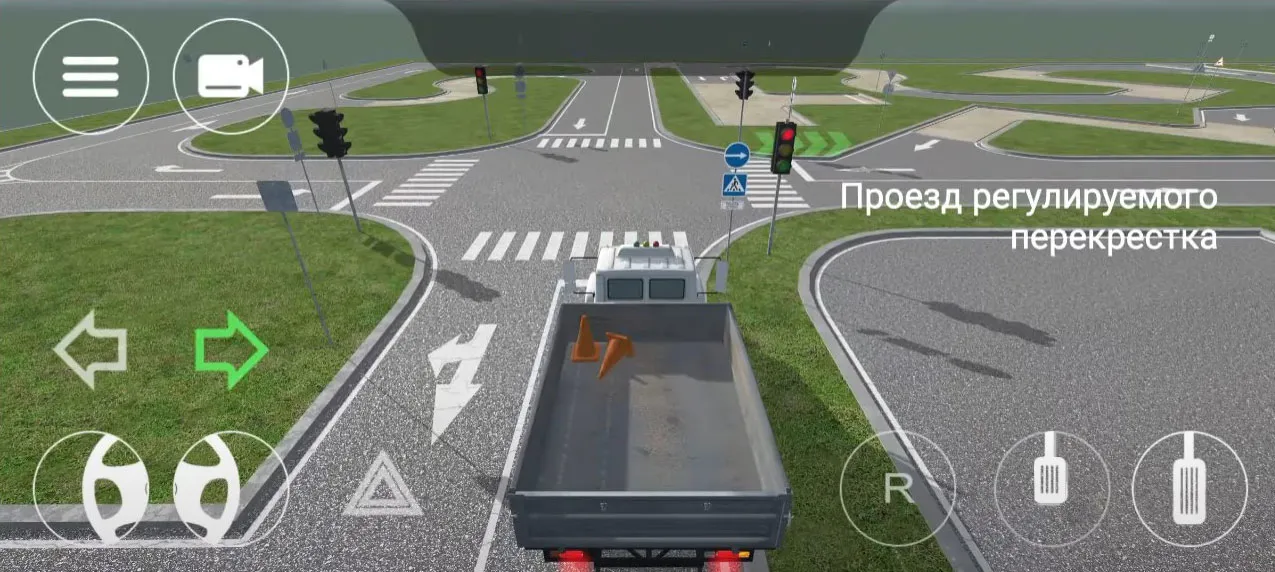
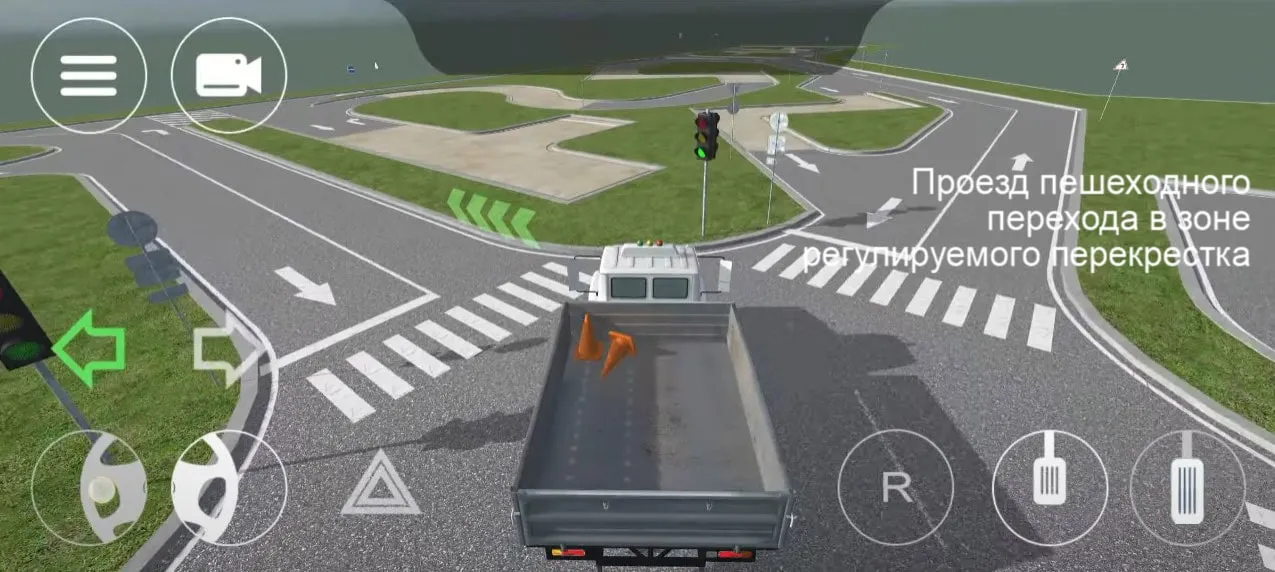
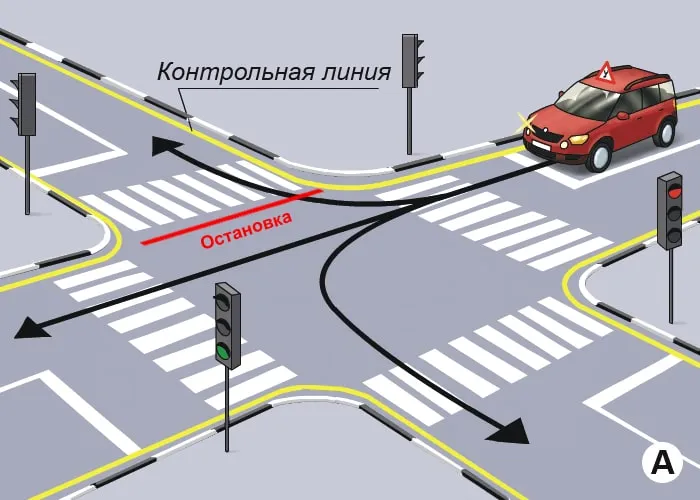
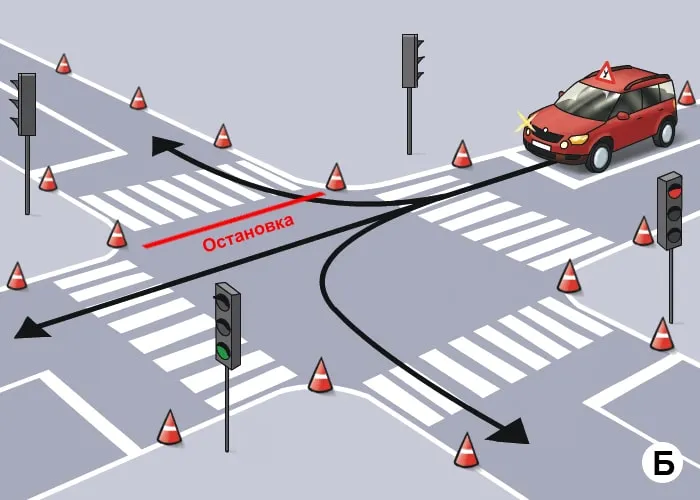
| 4. ПРОЕЗД РЕГУЛИРУЕМОГО ПЕРЕКРЕСТКА |
| |
ОПИСАНИЕ
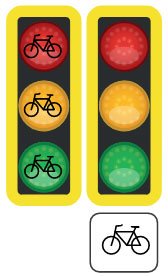
1. Поочередно, согласно схеме движения, проедьте регулируемый перекресток в направлении прямо, направо и налево, соблюдая требования сигналов светофора;
2. При включении запрещающего сигнала светофора -остановите ТС не более 1 метра перед линией «СТОП»;
3. При включении разрешающего сигнала светофора проедьте перекресток в заданном направлении;
4. При выполнении левого (правого) поворотов заблаговременно включите соответствующий указатель поворота.
Время проезда перекрестка при разрешающем сигнале светофора не должно превышать 20 секунд.
ОШИБКИ И ШТРАФНЫЕ БАЛЛЫ
– Проехал перекресток или пересек линию «СТОП» при запрещающем сигнале светофора. 100 ШБ
– На проезд перекрестка при разрешающем сигнале светофора затрачено более 30 сек.. 100 ШБ
– На проезд перекрестка при разрешающем сигнале светофора затрачено более 20 сек.. 20 ШБ
– Не включил соответствующий указатель поворота при пересечении перекрестка с поворотом направо или налево. 5 ШБ
– Остановил ТС на расстоянии более 1 метра перед линией «СТОП». 5 ШБ
|
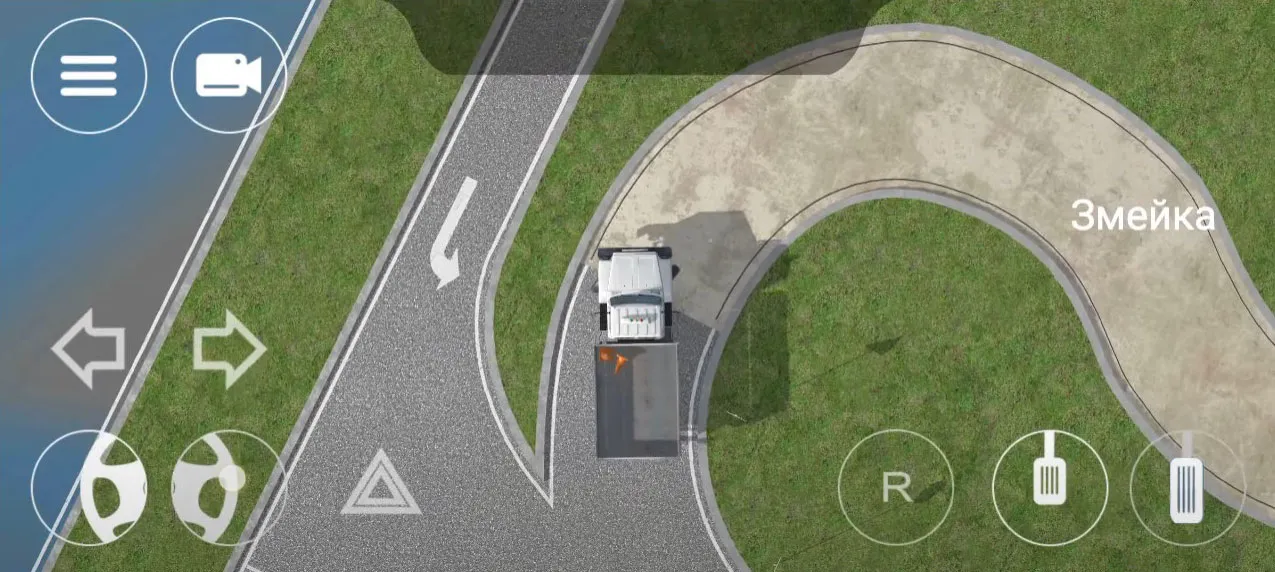
| 5. ЗМЕЙКА |
| |
ОПИСАНИЕ
1. Водитель должен не более чем за 2 минуты проехать участок дороги с левым и правым поворотами, не наезжая колесом на контрольные линии.
ОШИБКИ И ШТРАФНЫЕ БАЛЛЫ
– Наехал колесом на контрольную линию. 20 ШБ
– Затратил на выполнение упражнения более 2 минут. 15 ШБ
|
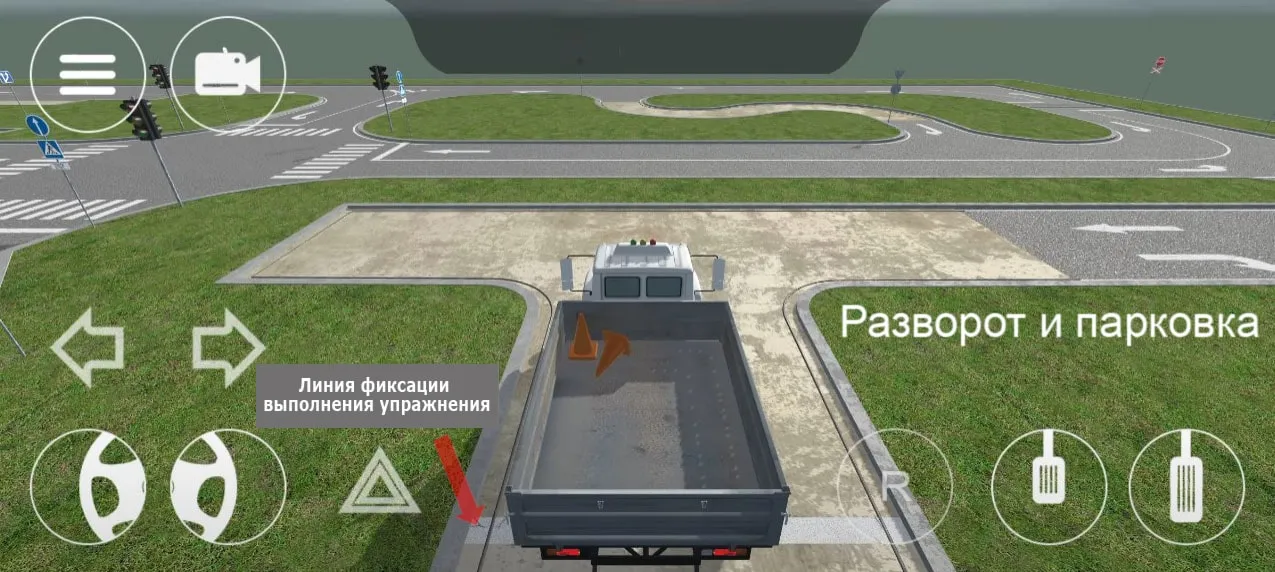
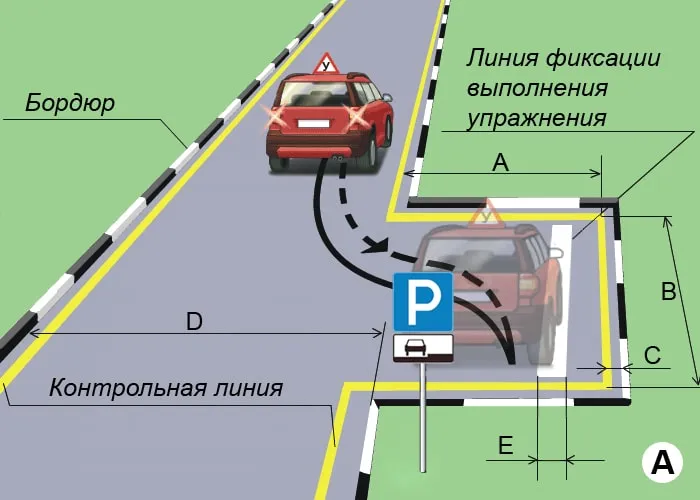
| 6. РАЗВОРОТ И ПАРКОВКА |
| |
ОПИСАНИЕ
1. Не более чем за 2 минуты, не наезжая колесом на контрольные линии, установите ТС на место парковки задним ходом так, чтобы задние колеса ТС находились на линии фиксации выполнения упражнения или пересекли её, а затем выедете в обратном направлении.
ОШИБКИ И ШТРАФНЫЕ БАЛЛЫ
– Не коснулся колесами ТС линии фиксации выполнения упражнения. 20 ШБ
– Наехал колесом на контрольную линию. 20 ШБ
– Затратил на выполнение упражнения более чем 2 мин.. 15 ШБ
|
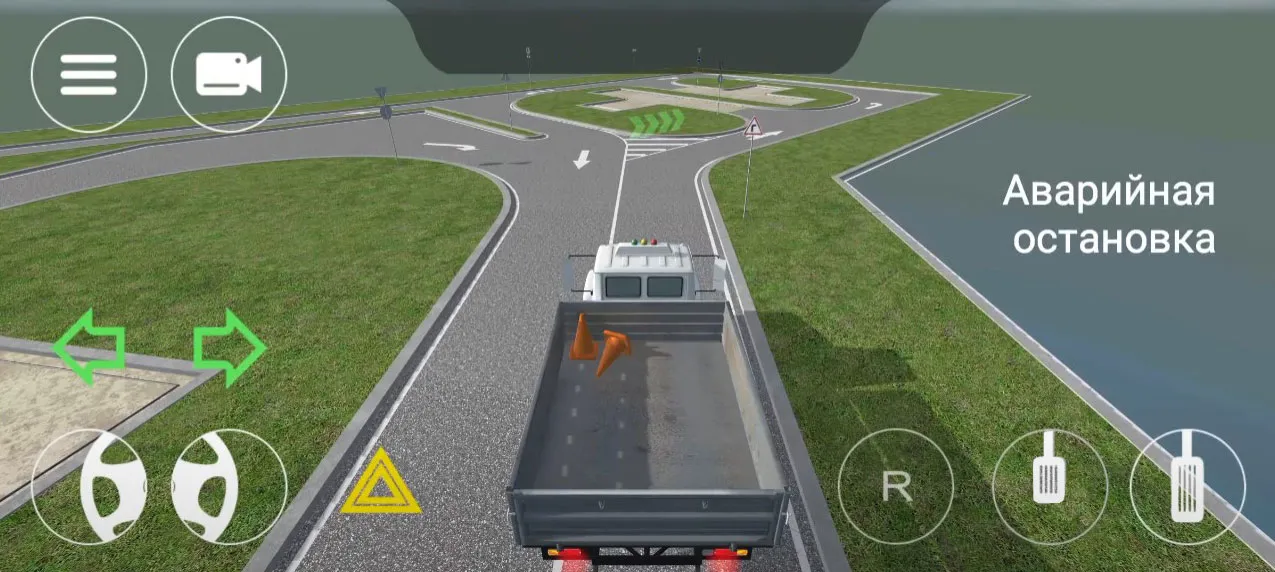
| 7. АВАРИЙНАЯ ОСТАНОВКА |
| |
ОПИСАНИЕ
1. После включения светового и/или звукового сигнала в салоне ТС в течении 2 секунд остановите ТС;
2. В течении 3 секунд включите аварийную световую сигнализацию.
3. После отключения специального сигнала (красного маяка) выключите световую сигнализацию и продолжите движение.
ОШИБКИ И ШТРАФНЫЕ БАЛЛЫ
– Не остановил ТС в течении 2 сек. после светового и/или звукового сигнала в салоне ТС и/или не включил аварийную световую сигнализацию в течении 3 сек. после остановки. 10 ШБ
– Перед началом движения не выключил аварийную световую сигнализацию. 20 ШБ
|
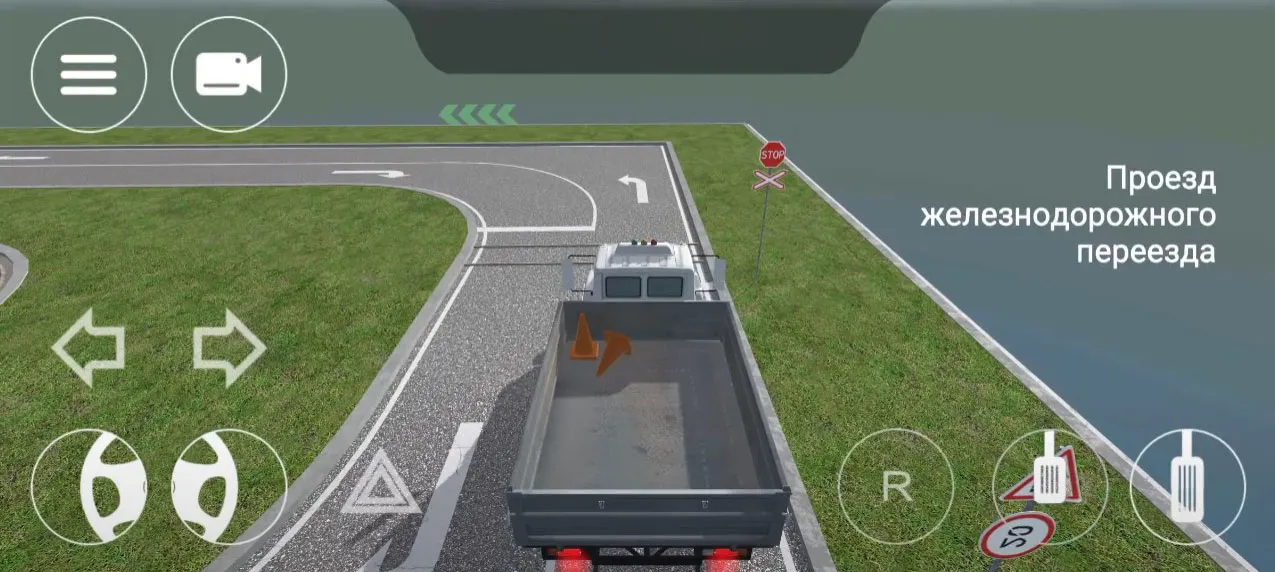
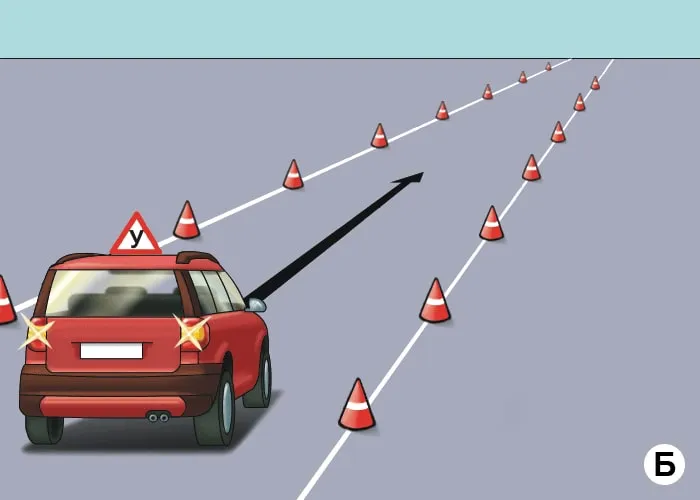
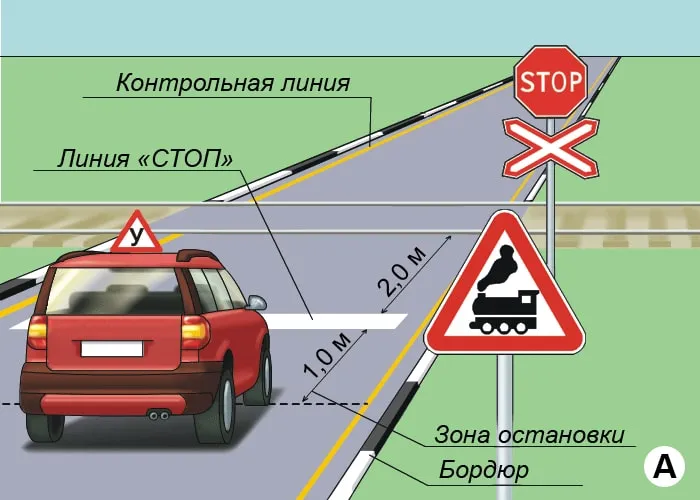
| 8. ПРОЕЗД ЖЕЛЕЗНОДОРОЖНОГО ПЕРЕЕЗДА |
| |
ОПИСАНИЕ
1. Остановите ТС на расстоянии не более 1 метра перед линией «СТОП» у железнодорожного переезда и продолжите движение не ранее чем через 3 секунды после остановки.
ОШИБКИ И ШТРАФНЫЕ БАЛЛЫ
– Наехал на линию «СТОП» или пересек её по проекции переднего габарита ТС до остановки. 25 ШБ
– Остановил ТС на расстоянии более 1 метра перед линией «СТОП». 5 ШБ
– Начал движение ранее, чем 3 сек. после остановки. 25 ШБ
|
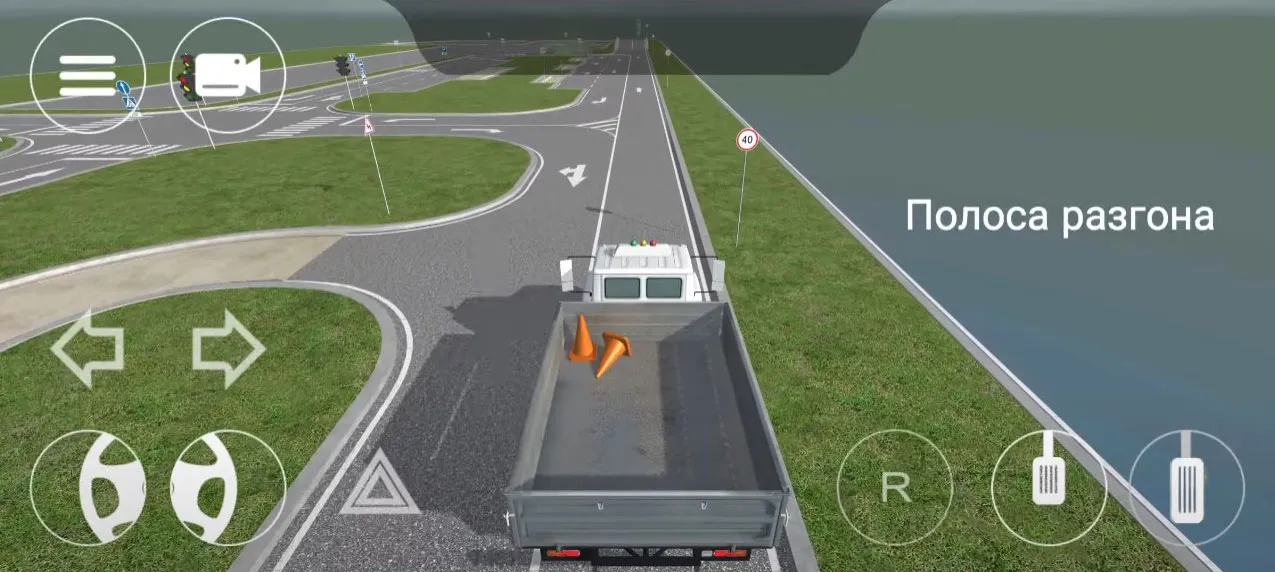
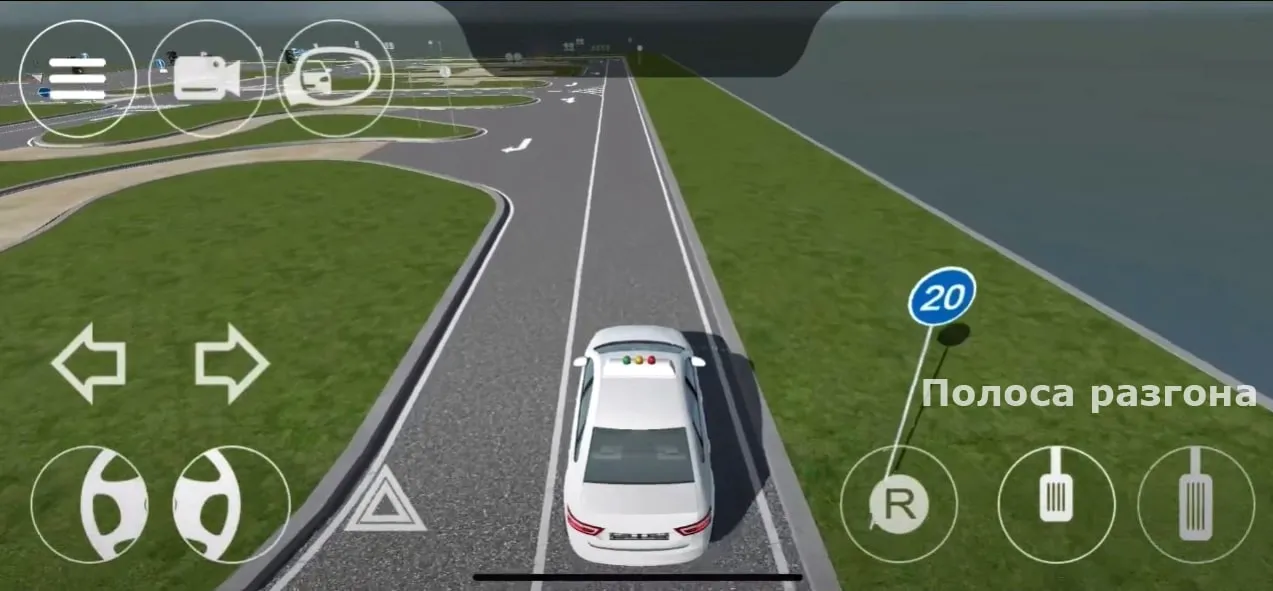
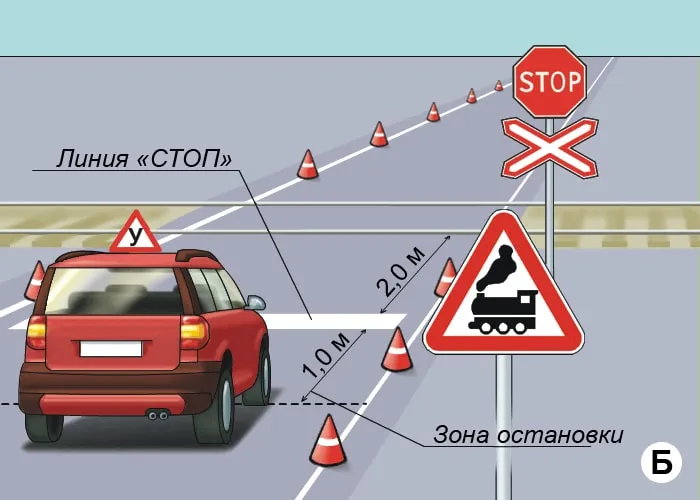
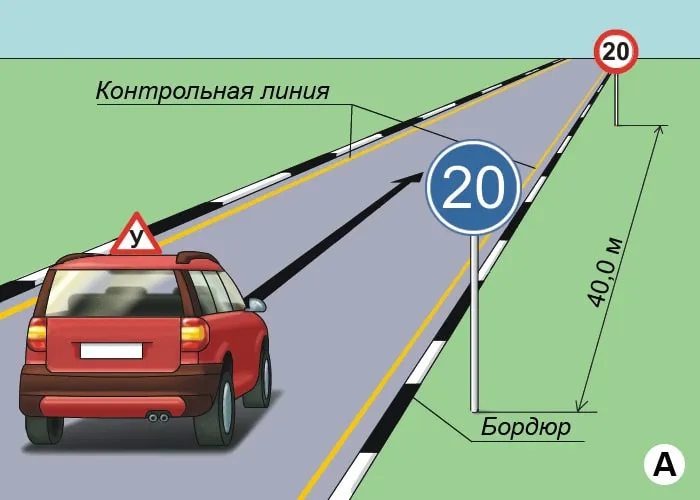
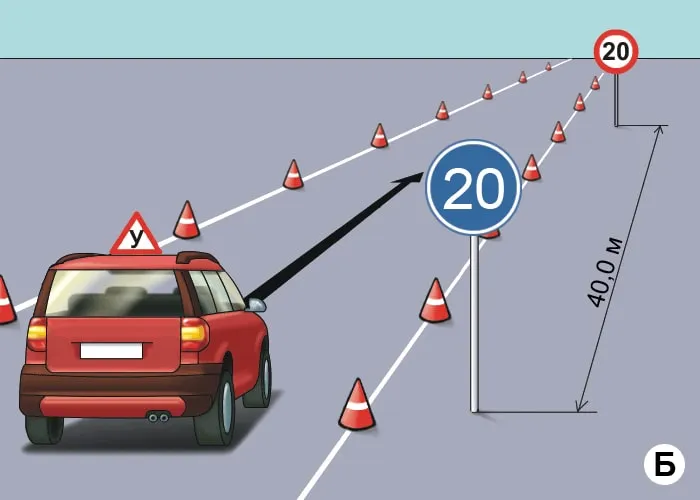
| 9. ПОЛОСА РАЗГОНА |
| |
ОПИСАНИЕ
1. Водитель должен после проезда дорожного знака “ограничения минимальной скорости” (20 км/ч) на участке пути длиной не более 10 метров увеличить скорость движения транспортного средства до 20 км/ч и более, переключиться с первой на вторую передачу и продолжить движение заданной скоростью, при наличии автоматической трансмиссии поддерживать установленную скорость.
2. За 10 метров до дорожного знака “ограничение максимальной скорости” (20 км/ч) снизить скорость движения транспортного средства до 20 км/ч и менее, переключиться со второй на первую передачу, при наличии автоматической трансмиссии поддерживать установленную скорость.
ОШИБКИ И ШТРАФНЫЕ БАЛЛЫ
– Не включил соответствующую передачу на заданном отрезке пути для транспортных средств с механической трансмиссией. 25 ШБ
– Нарушил требования дорожных знаков. 5 ШБ
|
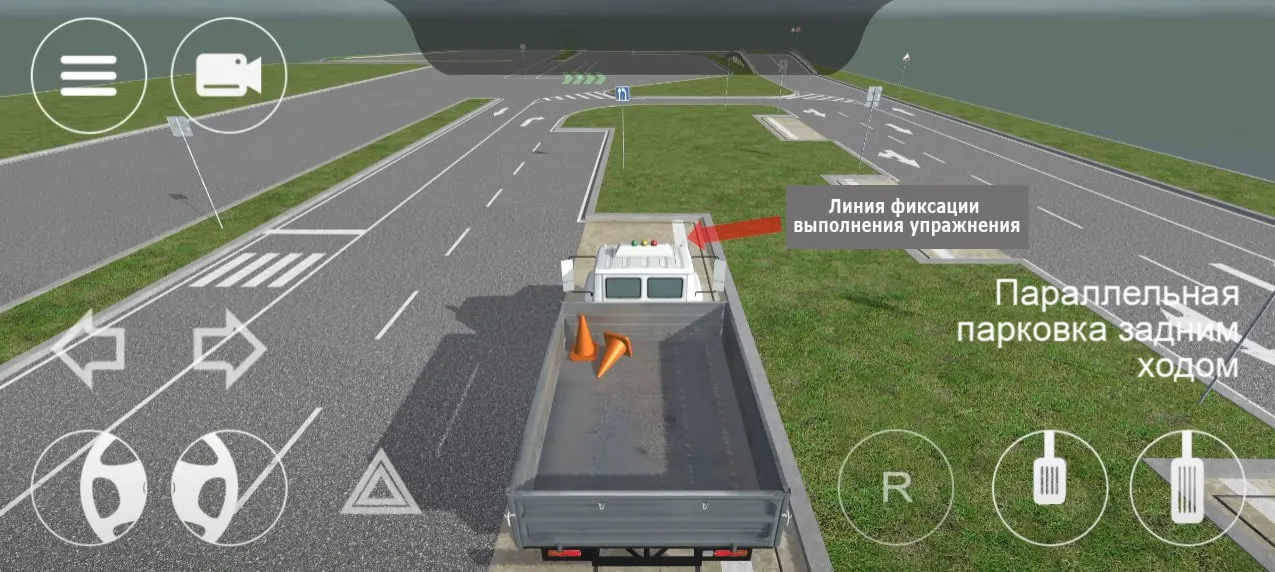
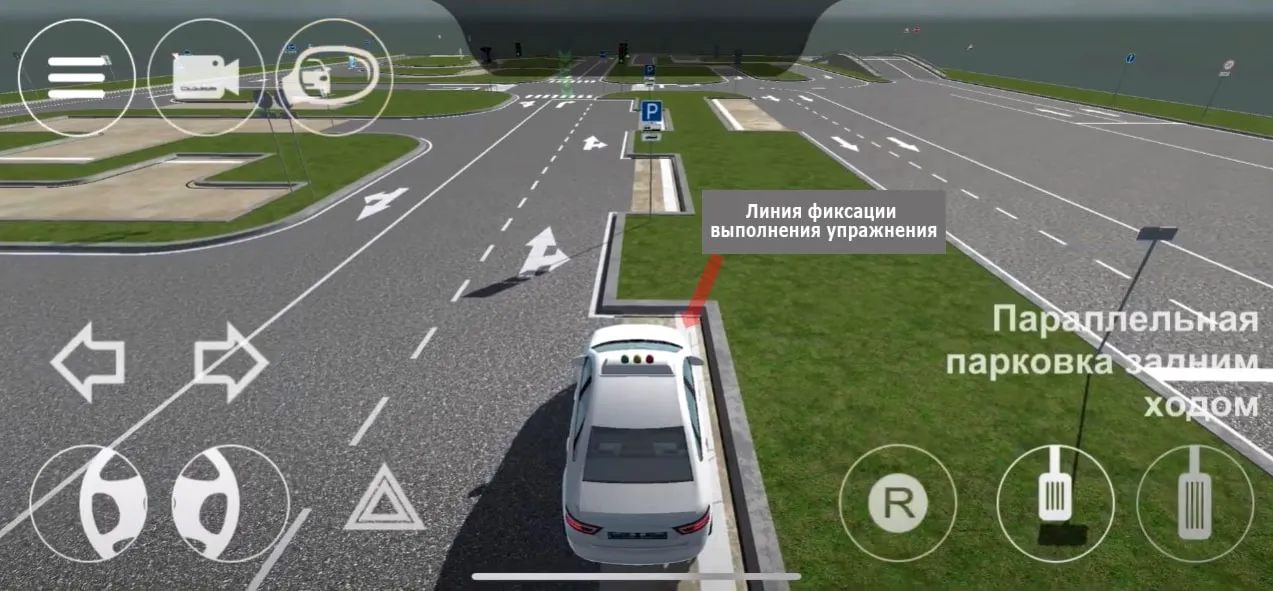
| 10. ПАРАЛЛЕЛЬНАЯ ПАРКОВКА ЗАДНИМ ХОДОМ |
| |
ОПИСАНИЕ
1. Не более чем за 2 минуты, не наезжая колесом на контрольные линии, установите ТС задним ходом на место парковки так, чтобы переднее и заднее правые колеса находились на фиксации выполнения упражнения, а затем выедьте с места парковки.
ОШИБКИ И ШТРАФНЫЕ БАЛЛЫ
– Не установил ТС на линию фиксации выполнения упражнения правыми передним и задним колесами. 20 ШБ
– Наехал колесом на контрольную линию. 20 ШБ
– Затратил на выполнение упражнения более 2 минут. 15 ШБ
|
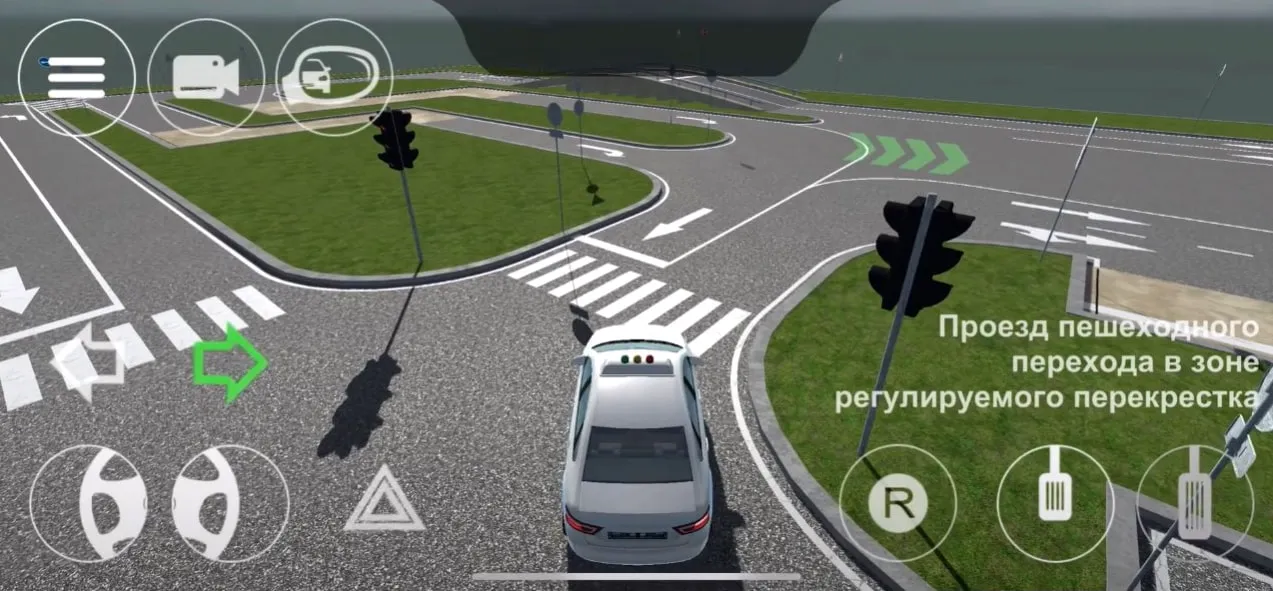
| 11. ОСТАНОВКА ПЕШЕХОДНОГО ПЕРЕХОДА ПРИ ПОВОРОТЕ НАПРАВО |
| |
ОПИСАНИЕ
1. Остановить ТС при повороте направо перед пешеходным переходом и продолжить движение не ранее чем через 3 сек.
ОШИБКИ И ШТРАФНЫЕ БАЛЛЫ
– Наехал на дорожную разметку. 25 ШБ
– Остановил ТС на расстоянии более 1 метра перед пешеходным переходом. 5 ШБ
– Начал движение ранее, чем 3 сек. после остановки. 25 ШБ
|
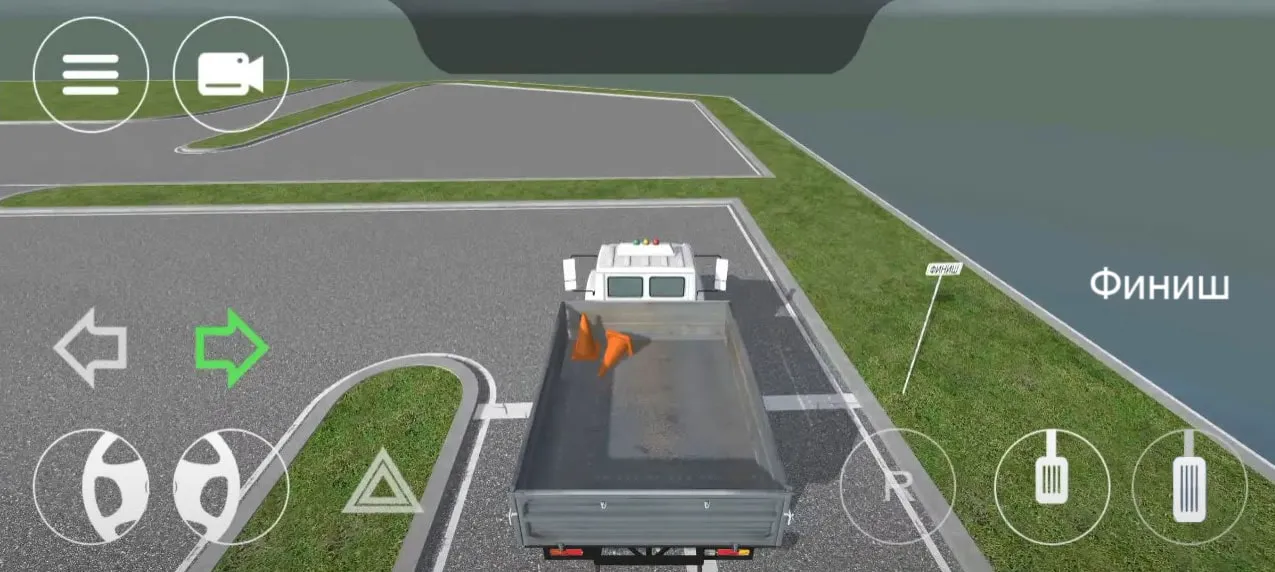
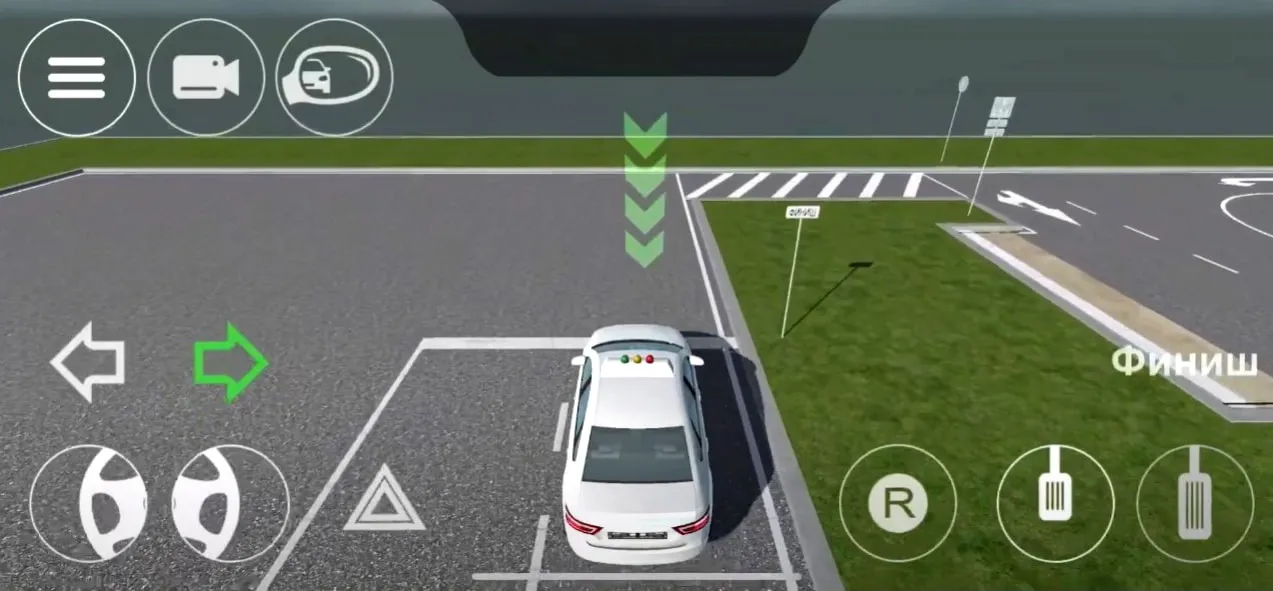
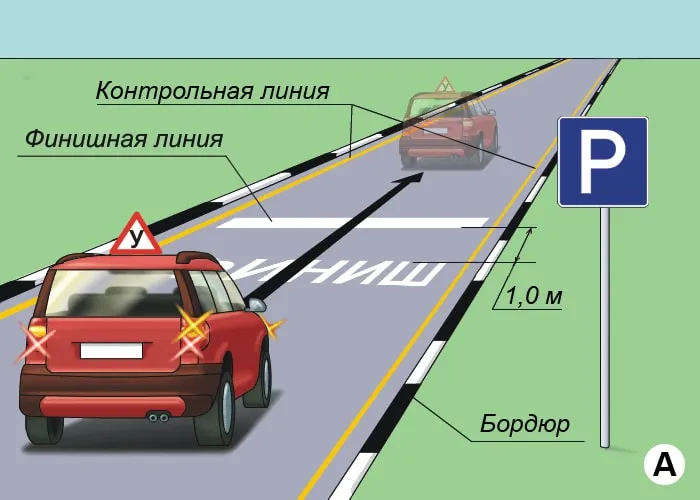
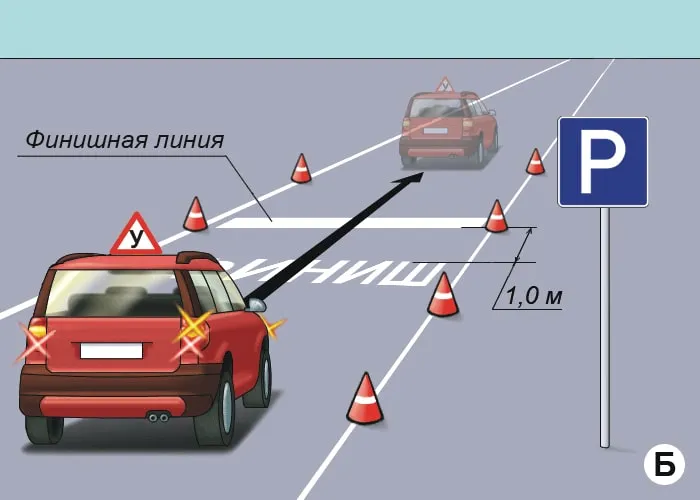
| 12. ФИНИШ |
| |
ОПИСАНИЕ
1. Включите указатель правого поворота;
2. Переките по проекции габаритов ТС финишную линию;
3. Остановите ТС в установленном месте;
4. Выключите указатель правого поворота;
5. Включите нейтральную передачу (при наличии автоматической трансмиссии;
6. Установите орган управления режимами трансмиссии в положение «Р»);
7. Заглушите двигатель;
8. Включите стояночный тормоз;
9. Отстегните ремень безопасности, покиньте ТС.
ОШИБКИ И ШТРАФНЫЕ БАЛЛЫ
– Не включил указатель правого поворота до пересечения финишной линии. 5 ШБ
|


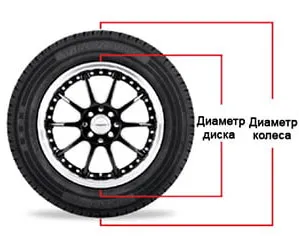


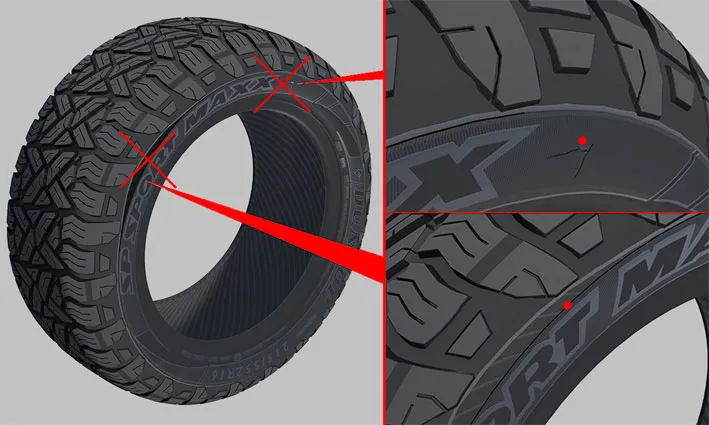
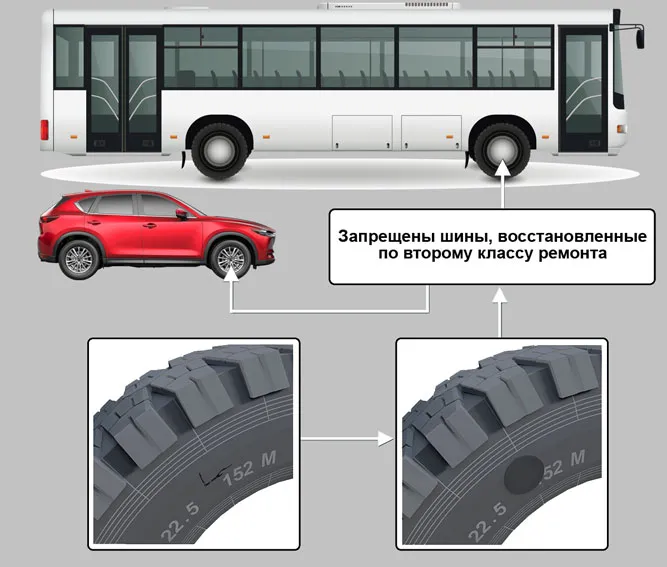
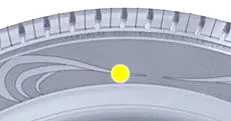 Yellow markers in the form of a small triangle or spot with a diameter of 5–10 millimeters are applied by the manufacturer to the tire’s sidewall at its lightest point, determined at the factory using the balancing method. During installation, this marked spot should be aligned with the “L” symbol on the rim (the light zone of the wheel), or if absent, with the inflation valve (nipple). Following these recommendations allows the assembled wheel to be balanced as evenly as possible, requiring fewer compensating weights during balancing. It is clear that the weight difference between individual zones of the wheel is minimal, so the relevance of the yellow mark diminishes during active tire use, even before the next tire remount.
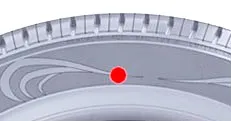 Similarly to the previous mark, the red one indicates the stiffest—and therefore heaviest—area of the tire’s sidewall. Accordingly, it is placed on the side and should be aligned with the “L” on the rim or positioned opposite the valve. Red marks are most often found on tires supplied as original equipment for vehicles. It should be noted that rims from the original equipment set have a marking (white dot) that should be aligned with the red marks.
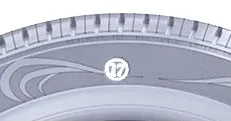 A white mark in the form of a circle, triangle, diamond, or square with a number inside, located on the tire’s sidewall, is analogous to the quality control (OTK) mark familiar to people since the Soviet era. Its presence indicates that the product has passed the factory’s final quality inspection and fully meets the stated specifications. In addition, this stamp identifies the specific company employee responsible for the accuracy of the quality control performed on the finished tire.
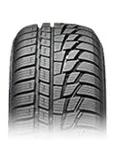
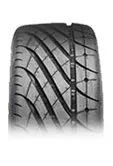
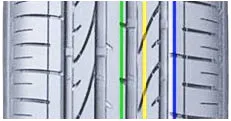 Colored lines on a tire’s tread are intended to identify tire sizes and models when stacked in racks or pyramids in a warehouse. Tires of a specific size are marked with stripes of unique color, width, and placement, which greatly helps warehouse workers recognize the correct product among many similar ones. Additionally, the colored lines serve as an indicator to determine whether the tire has undergone a break-in period.
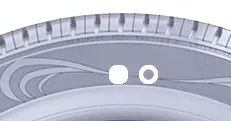 Some tire manufacturers apply white circle or dot markers to products intended for original vehicle equipment. The location of this mark indicates the point of minimal radial force deviation. In other words, it is the most flexible point on the tire’s sidewall. When assembling the wheel, this marker should be aligned with the “L” on the rim or matched with the “top” mark on the wheel.
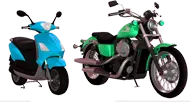


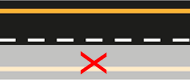
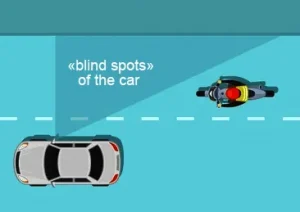 Blind spots — the first cause of accidents! The blind spots correspond to the full right/left length of the vehicles. The driver is not able to see that someone is riding a bike nearby. Trucks and buses also have significant blind spots where cyclists are invisible.


 Unfortunately, even impeccable compliance with traffic Rules does not guarantee complete safety on the road. If there is the slightest uncertainty or distrust of the driver of another vehicle, it is better to give way. The most common violations of cyclists that lead to accidents; riding in the oncoming lane, riding on the sidewalk, running a red light, maneuvering in front of moving vehicles, riding without lighting devices at night.